
Graphical User Interfaces (GUIs) are still a sore subject in Rust. The ecosystem is certainly better than when I started was a few years ago, with egui and iced providing successful models for GUI projects. However, I still think there are models to explore that are interesting and potentially better than what’s out there now.
Unfortunately there is a decently-sized hurdle to creating a brand new GUI framework: you need a way to draw it. For a journeyman programmer trying to implement their own GUI framework, it’s often one of the hardest parts of the process. The usual model is to take advantage of vector graphics; you describe a path containing however many lines or curves, and then either fill it will a color (or other pattern) or turn it into a stroke (line). Especially when targeting certain windowing systems, this vector graphics implementation can become very complicated, very quickly.
iced, egui and slint provide their own implementations of graphics that are difficult to separate from the framework itself. Unfortunately, these are not a real option. druid, on the other hand, is built on the piet abstraction. piet provides an API for vector graphics, but there are several different implementations for piet. The reference implementation is piet-common; however, it’s pretty tightly integrated with druid-shell and difficult to get up and running with anything else, like winit.
In my attempts at creating an easily re-usable vector graphics implementation not tied to any GUI framework or windowing system, I decided that I’d create a piet implementation that can be used with any windowing framework. Thanks to the raw-window-handle crate, it should be easy to just plug in a windowing system and go. I also ae a handful of other goals in mind, like minimizing the use of non-Rust dependencies. I’ve named it theo, and I think that it’s getting close to an initial release.
During my development, I’ve noticed that piet comes with a “samples” framework. It has a few examples of using the drawing API, which aims to consistently draw a set of “sample” images. These images showcase the features of the drawing API, like text, transforms and clipping. The CI for piet-common, the reference implementation of piet, runs these samples, saves them to images and compares the output to a set of reference images. This is a great way to use CI to tests for regressions in the drawing API. If a bug is introduced in the drawing code, they know immediately.
I decided to try using these samples for myself. I wasn’t prepared for what happened next.
Notgull Note: Throughout this series I will run into issues and problems with certain Rust crates, and maybe even badmouth them at times. I don’t want this to come off as unappreciative; the ecosystem built around graphics in Rust is actually pretty mature. It just needs a few robustness tweaks.
Get Going
Well, I would think that I’ve done a good job of implementing the API so far, right? If it were 2012 and I were a Gopher, I’d call myself a 10xer. Let’s hook up the samples and see what happens.
theo’s GPU implementations are based on two other crates: piet-wgpu and piet-glow. I am a firm believer in compartmentalized software. If you were to develop some kind of user interface that runs on top of OpenGL, you could take piet-glow and use it for drawing. The same goes or wgpu, especially since wgpu is designed specifically with middleware in mind. If I feel that a part of the code can be used for some other purpose, I like to split it off into another crate.
I started with piet-glow first, because I’m a 21-year-old Boomer who only knows GL. This turned out to be a bit of a mistake; wgpu is way better at rendering images without a window present than OpenGL. But, as it turns out, wgpu is its own horse and pony show. More on that later.
I already have a pretty good setup for running OpenGL code. In my examples, I have a shared util module that handles all the GL messiness. Just from the util module, I can instantiate a GlutinSetup type that contains a GL display, a GL context, a window (for Windows, where you need to create the window before you create the GL display) (don’t ask, we’ll be here all day) and a context that can be made “current”. It also provides functionality to create the glow context, abstracting over the subtle differences between desktop GL and WebGL.
I won’t repeat the setup here, because it’s about 500 lines of windowing, OpenGL and image handling code. Not the kind of thing that makes for an engaging blog post. The important part is that it calls piet’s samples_main call, which handles generating, saving and comparing sample images. Easy, right?
Let’s see how they turned out! Here’s one of the reference images, generated by piet-common’s Cairo implementation:
It’s a nice little demonstration of how text rendering works, with varying decorations and colors. Let’s see how piet-glow did:
thread 'main' panicked at 'capture_area is not implemented yet!', crates/piet-wgpu/src/context.rs:727:9
note: run with `RUST_BACKTRACE=1` environment variable to display a backtrace
…nothing! The test harness panicked! Hooray!
Let’s just wrap that in a panic harness and then everything should be good, right? That panic certainly isn’t indicative of a much deeper issue.
…okay. We have some work to do.
Low Hanging Fruit
There are 17 piet samples. Out of these samples, eight of them outright refused to work, returning errors. Out of the remaining nine, all of them are flipped upside-down. Then, most of them have very flagrant errors in them.
For the problem number two, this is my fault for not looking up how glReadPixels worked before running the code. I thought it read things from the top down, not the bottom up. Lesson learned: read the docs.
I just run image::imageops::flip_vertical_in_place to fix that, since this is an example and I don’t really want to make this too complicated.
// Somewhere in the rendering harness...

// Get the data out of the texture.
let mut data = vec![0; scaled_width as usize * scaled_height as usize * 4];
unsafe {
    ctx.read_pixels(
        0,
        0,
        scaled_width as i32,
        scaled_height as i32,
        glow::RGBA,
        glow::UNSIGNED_BYTE,
        glow::PixelPackData::Slice(&mut data),
    );
}

// Store the data in an image buffer.
let mut img =
    image::RgbaImage::from_vec(scaled_width, scaled_height, data).unwrap();

// NEW: Flip it around.
image::imageops::flip_vertical_in_place(&mut img);

// Save to a file.
img.save(path)?;
Alright, we’re basically halfway there! It’s all downhill from here, right!
Number 1: Lethal Lines
Let’s start simple. piet zero-indexes its samples, so this is actually sample number two. But the first one is pretty complicated, so I’ll save that for last.
The reference image is a rendering of a Bezier curve, to demonstrate curve rendering. If I were starting from scratch, the math behind this would be very intimidating. It’s good thing that Rust already has a robust ecosystem for handling these curves, thanks to kurbo and lyon. The latter of which I use for converting all of these curves into triangles.
I’ll use piet-cairo as a “source of truth” for reference images. For this sample, here’s what piet-cairo makes:

Here’s what my renderer spits out:

I got this one mostly right. There’s just a few inconvenient oddities:
- I scaled the image improperly; it should by scaled up by a factor of two.
- The tolerance of the curves are way too low. You can see that the Bezier curve has, like five segments. It should have more.
- Everything is way too pixelated.
The first two issues are pretty easily fixed by twisting a few knobs. The first thing with the scaling can just be fixed with a couple of adjustments.
// Get the size of the picture to draw.
let size = picture.size();

// Scale up the width and height and use these as the dimensions of the texture.
let scaled_width = (size.width * scale) as u32;
let scaled_height = (size.height * scale) as u32;

// <snip: a lot of texture initialization code>

// Create a piet-glow render context.
let mut rc = unsafe { context.render_context(scaled_width, scaled_height) };

// Apply a scaling transform.
piet::RenderContext::transform(&mut rc, piet::kurbo::Affine::scale(scale));

// Draw with the context.
picture.draw(&mut rc)?;
Same with the tolerance. In piet-hardware, I have initialization code that looks like this:
RenderContext {
    tolerance: 1.0,
    /* ... */
}
It’s as simple as changing it to this:
RenderContext {
    tolerance: 0.1,
    /* ... */
}
I think the third issue happens because anti-aliasing isn’t working properly. Thankfully that’s not a problem with the codebase itself, that can be fixed pretty easily by just rewriting my rendering harness a little. On the OpenGL end, that involves creating a new multisampled texture, rendering to that instead, and then copying the multisampled texture to a regular texture. All in all, just a lot of OpenGL boilerplate that isn’t really worth repeating here.

So far, so good! What’s next?
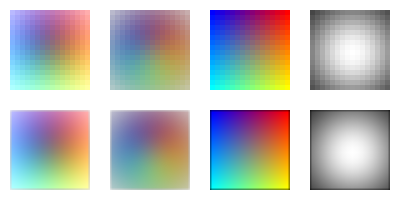
Number 2: Image Insanity
This one, I got //almost// right. Here’s the reference image:
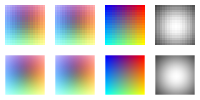
Here’s what piet-glow makes:
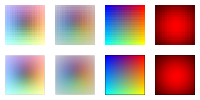
Again, very close! Very tantalizingly close!
Looking at the images, they’re almost right. They’re a little bit darker; in fact, the premultiplied color image looks to be a little too dark for my taste. I ignore premultiplying in my code, so that checks out. I’ll fix that later.
The elephant in the room is that the image on the right is red instead of grayscale. I originally used GL_RED to represent grayscale, but foolishly forgot to accommodate for that in my shader code.
So far I fix it by just allocating a new buffer and manually converting the grayscale to RGB.
// Somewhere in piet-glow...

let grayscale_data;
let mut data = /* ... */;

// Figure out the formatting parameters for the texture.
let (internal_format, format, data_type) = match format {
    piet::ImageFormat::Grayscale => {
        // Collect the grayscale data into a new buffer, repeated for RGB.
        grayscale_data =
            data.map(|data| data.iter().flat_map(|&v| [v, v, v]).collect::<Vec<_>>());
        data = grayscale_data.as_deref();

        (glow::RGB8, glow::RGB, glow::UNSIGNED_BYTE)
    }

    // Other formats are simple to handle.
    piet::ImageFormat::Rgb => (glow::RGB8, glow::RGB, glow::UNSIGNED_BYTE),
    piet::ImageFormat::RgbaPremul => (glow::RGBA8, glow::RGBA, glow::UNSIGNED_BYTE),
    piet::ImageFormat::RgbaSeparate => (glow::RGBA8, glow::RGBA, glow::UNSIGNED_BYTE),
    _ => panic!("unsupported image format: {format:?}"),
};
It’s definitely hacky. In reality, the best way would be to write shaders in such a way that they can handle the various different formats of images. In practice, that’s a lot of code for very little practical benefit, as this “image formatting” should be a cold operation anyways. I’m not even sure who uses grayscale images. Definitely an issue to look into later.
For now though, it works. I only had to compromise a little, I’m sure I won’t have to compromise more later. What’s next?
Interlude: WebGPU Woes
These samples are all well and good, but we’re forgetting something crucial so far. There are two rendering backends in use here; one for OpenGL and one for wgpu. I’d like to use the wgpu one as the primary renderer for my application, wgpu being the new modern, safe abstractions for GPU. I just really like Vulkan, okay?
Originally, I said that wgpu is pretty easy to render to an image, as opposed to OpenGL, which makes you open a window and all. Let me correct that. wgpu is easy to render to an image, as long as you aren’t a doofus.
It’s me! I’m the doofus!
When I was first writing piet-wgpu, I styled the API like this:
pub trait DeviceAndQueue {
    fn device(&self) -> &wgpu::Device;
    fn queue(&self) -> &wgpu::Queue;
}

// <snip> Implement this trait for tuples like (Device, Queue), (Rc<Device>, Rc<Queue>), etc.

pub struct WgpuContext<DaQ> { /* ... */ }

impl<DaQ: DeviceAndQueue> WgpuContext<DaQ> {
    // Create a new base context.
    pub fn new(daq: DaQ) -> Self { /* ... */ }

    // Start the rendering process.
    pub fn render_context(&mut self, view: wgpu::TextureView) -> RenderContext<'_> { /* ... */ }
}
The gist of it is: the base context (which holds all of the shared state) owns the wgpu::Device and the wgpu::Queue. When you want to render, you pass it a wgpu::TextureView, which corresponds to your window or wherever else you want to write to. Once you’re done (i.e. you call RenderContext::flush()), a render pass is created, the queue is flushed and everything works out, right?
This made sense to me, after skimming the important parts of the wgpu API and deciding that I was going to throw a window and nothing else at this API. Except, turns out, that’s a bad idea! You’re not really supposed to own the wgpu::Device or the wgpu::Queue. They’re supposed to be “shared” in a way, such that all of your drawing resources make calls to the wgpu::Queue. Then and only then, at the end of all of it, the wgpu::Queue is submitted. wgpu::Queue::submit() is a cold operation, so calling it lots of times is a bad idea. Especially with lots of windows, the lag is noticeable, I’ve found.
You’re also not really supposed to be creating your own render pass, which is what I was doing, too. In fact, wgpu has an idiom for this: the middleware pattern. The idea is that the modules of the software should be structured in a way my API should actually look more like this:
pub struct WgpuContext { /* ... */ }

impl WgpuContext {
    // Create a new base context.
    pub fn new(
        device: &wgpu::Device,
        queue: &wgpu::Queue,
        texture_format: wgpu::TextureFormat,
        sample_count: u32
    ) -> Self { /* ... */ }

    // Prepare for rendering by providing a render context and setting up for a render.
    pub fn prepare<'this, 'dev, 'queue>(
        &'this mut self,
        device: &'dev wgpu::Device,
        queue: &'queue wgpu::Queue
    ) -> RenderContext<'this, 'dev, 'queue> { /* ... */ }

    // Once all the rendering is done, push it into this render pass.
    pub fn render<'this>(&'this mut self, pass: &mut wgpu::RenderPass<'this>) { /* .. */ }
}
The idea is that the prepare() method sets up all of the drawing primitives to be rendered. In this case, prepare() returns the RenderContext, which the user uses to runs their drawing. Finally, it’s the render() function that pushes to the rendering pass, which is then ultimately submitted to the queue.
This may seem like an ultimately meaningless distinction. I thought so at first! After all, it’s all being pushed to a wgpu::Queue, right?
Well, let’s say you eventually want to do something with that, aside from just rendering it to the window. Say, let’s say you want to copy the data out of the texture into a buffer so you can save it to the disk. Such as, my current use case.
I stumbled onto a scenario that might’ve been obvious to someone more informed than me. I did a “copy to buffer” command after I’d already submitted the queue (in flush()), and… I got nothing! The texture was empty, and I was writing blanks to the disk. It took me a while to figure out what was the issue was, but eventually I realized that I needed to rewrite a lot of code.
For instance! I originally structured my code in piet-hardware a lot like this, where the context is some backend-agnostic interface to the GPU.
pub struct Context<C> {
    context: Rc<C>,
    /* ... */
}

pub(crate) struct Texture<C> {
    context: Rc<C>,
    texture: C::Texture,
    /* ... */,
}

impl<C: GpuContext> Texture<C> {
    fn do_something(&self) { /* ... */ }
}
This made sense to me originally, especially because I was writing this primarily with OpenGL in mind. You have an immutable context that’s being passed around to all of these resources. I figured that, when I ported it to wgpu, I could always just use some interior mutability to glue everything together.
Unfortunately, interior mutability doesn’t really work here. You need to be able to pass a direct reference to your resources into the wgpu::RenderPass, and it doesn’t work if you’re using interior mutability!
struct WgpuContext {
    textures: RefCell<Vec<wgpu::BindGroup>>,
}

impl WgpuContext {
    fn render<'this>(&'this self, pass: &mut wgpu::RenderPass<'this>) {
        let mut textures = self.textures.borrow();
        pass.set_bind_group(0, &textures[0]);

        // `textures` is dropped here but `pass` still has a reference to it.
        // Does not compute! Literally and figuratively!
    }
}
So, I ended up rewriting a lot of the API to look more like this, where an &mut C is passed around manually through function arguments.
pub struct Context<C> {
    context: C,
    /* ... */
}

pub(crate) struct Texture<C> {
    texture: C::Texture,
    /* ... */,
}

impl<C: GpuContext> Texture<C> {
    fn do_something(&self, context: &mut C) { /* ... */ }
}
It adds a little bit more complexity to the implementation, but it helps the borrow checker make sense of all the lifetimes. As a bonus, I remove interior mutability from my codebase, which is a bad code smell.
…and after about an hour of work, two cups of coffee, and another brick in The Wall, I’ve finally restructured my code to use that middleware pattern. Running the sample generator now, I finally get images that are identical to the reference images! To my untrained eyes, at least.
…except for a panic in the last sample, because I forgot to add support for RGB to the shader. I fix it in the same way I fixed the grayscale issue, by allocating a new buffer and manually converting the RGB to RGBA. Yay, allocations!
To be continued…
Wow, almost 2k words in and I’ve barely even arrived at any of the actual math behind the graphics. We’ve barely stumbled our way through two samples, with fifteen more to go. This sounds like it’s time for a unique moment in my so-far-short blogging career: it’s time for a cliffhanger a series!
Next time, we’ll take on line drawing and gradients, two very special use cases that I’m sure will be trivial to implement!